THE E-COC DASHBOARD EXPLAINED
Most of your time will spend on the Dashboard. It is the first screen that is presented after you sign in. It provides you with a detailed overview regarding usage. Allows you to create E-COC'S and other options such as uploading signatures.
Accessing the E-COC Application
Now that we have addressed all the requirements and prerequisites it is time to start using the Electronic Certificate of Compliance. First you will have to open up the application by way of the provided link when you signed up. Make sure that you open the link with Google Chrome.
You can also access the E-COC by simply entering the following link in your browser: http://ecoc.ecasa.co.za or by going to the ECA(SA) website and access it from there.
Below is an illustration concerning recommended and alternative access methods

-
The recommended method is a shortcut to the E-COC Application but it also ensures that you do not accidentally use any other Browser to access the E-COC. Opening a link from Outlook may for example might accidentally open another Browser.
-
The alternative method is for the most part the same as above but if the ECA(SA)website is down or undergoing maintenance the option to access the E-COC may not show. However the end result is the same both will take you to the E-COC.
The E-COC Login
Once you have accessed the E-COC Application you will be presented with the Login window. To access please provide your username and password as provided in the input fields as illustrated below.

Remember that the username and password is case sensitive so please type it in exactly as you received it (you may also copy over your access details from the welcome email).
Please take note that your username will always be the same as your unique six digit Membership number and will never change, also it is a requirement built into the E-COC so unlike the password it cannot be customized. Lastly your username will always be uppercase.
Once you have entered your access details click on LOGIN
Dashboard principles explained
The E-COC dashboard as mentioned is where you will spend most of your time. In this section I will explain all the aspects of the Dashboard and how to use them
Below is an illustration of a sample of the dashboard. When you start using the Application a lot of the information displayed will first have to be created.
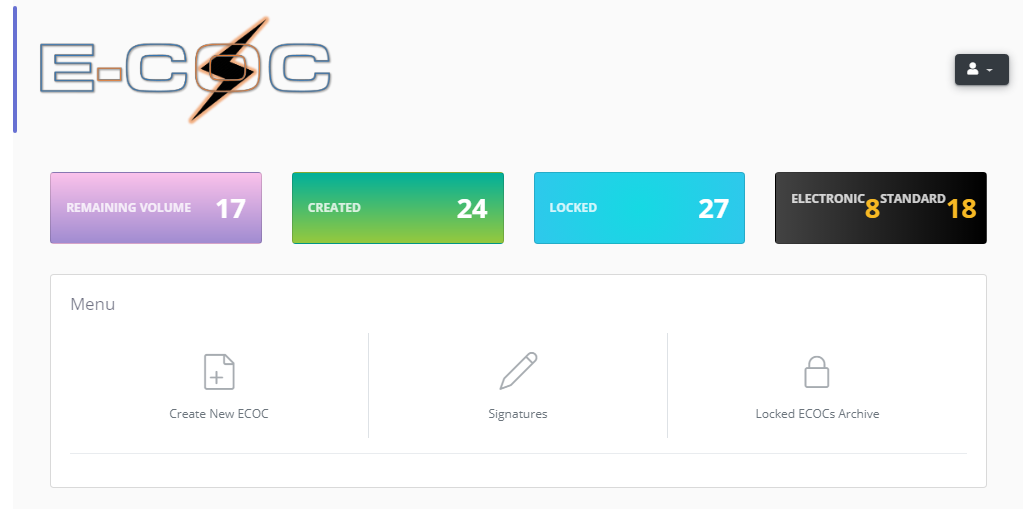
This is essentially what your Dashboard will look like at first. To better understand and explain the dashboard I am going to break it down in sections.
The Header
The header essentially displays the E-COC logo on the left and on the right you will see your username, logout link and the page you are on which remains the same throughout the E-COC Application.

- Essentially Welcome Message would serve no other purpose other to serve as a greeting and also for you to validate that this is your current profile
- The Logout link allows you to sign out at anytime, never leave the E-COC Application unattended (by default the E-COC will log your our after about 45 minutes of inactivity, but it is always recommended to Logout when you are done or not going to use the Application for the next while)
- The last arrow simply depicts the page you are on, however, the is a fragment carried over from previous versions of the E-COC can be considered as deprecated.
The Overview Panel
The Overview Panel provides you with with activity and breakdown usage information.

- Remaining Volume is essentially your purchase volume minus the amount that you have used.
- Created E-COC's is an indicator of how many E-COC's you have created till date.
- Locked E-COC's indicate how many of your E-COC's have been finalized, locked and archived.
- Electronic E-COC's simply indicates E-COC's which have been Electronically signed.
- Standard E-COC's simply indicates E-COC's which have been opted to be printed and self-signed.
The Options Panel
The options panel is where you perform all initial actions and commands. It is the starting point in creating a new E-COC
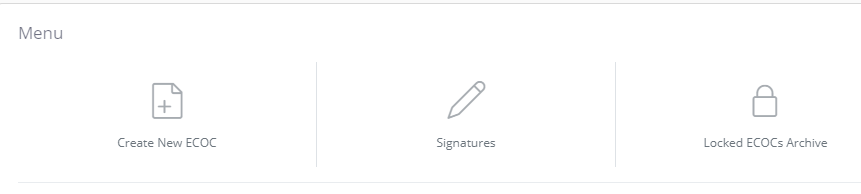
- CREATE NEW allows you to create a new E-COC.
- UPLOAD SIGNATURES allows you to upload new signatures used for Electronically signed E-COC's.
- VIEW SIGNATURES allows you to view uploaded signatures.
The Archive Panel
Once you have created and finalized your draft E-COC and after you have locked it your E-COC will be moved from the Workspace Panel and over to the Archive.

- To view archived E-COC's simply click on VIEW
The Workspace Panel
The Workspace Panel is where is all created but not yet finalized E-COC's are save. When you create a new E-COC all four pages of the E-COC becomes available to you to add information. In addition, the option to add additional test reports also becomes available and also the option to add supplementary pages.
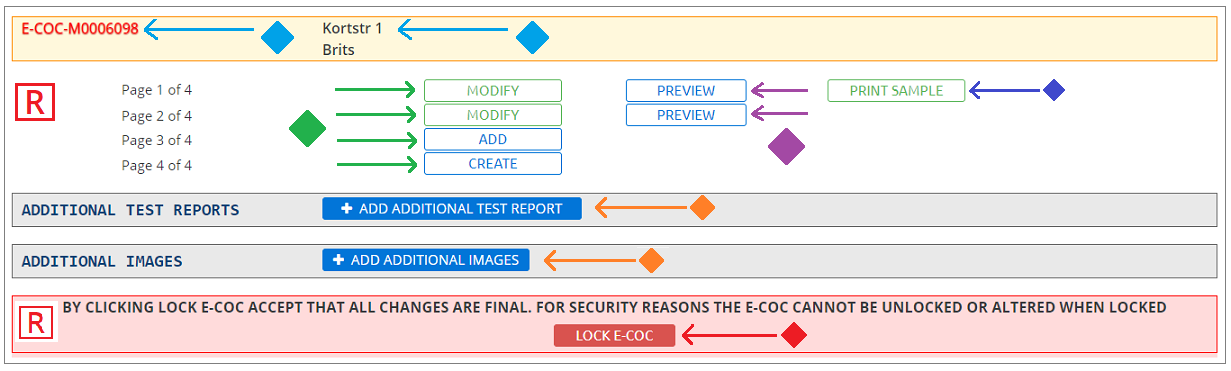
- Once you create an E-COC the E-COC Application will automatically assign a unique serial number to your created E-COC (as demonstrated by the light blue arrow).
- Similar the installation address and building (if any any) will be displayed to the right of the serial number so that you can always know which of your E-COC's are associated with which installation (indicated by the second light blue arrow).
- When you create a new E-COC you will see the following pages which makes up the standard COC as depicted by the green arrows.
- You can also preview your current work by clicking on the PREVIEW buttons next to the pages.
- Die preview all four pages of your draft E-COC simply click on the PRINT SAMPLE to preview your entire draft E-COC.
- The red [R] means the section is compulsory and must be completed
- Optionally you can add Additional Test Reports by clicking on the blue [ADD Additional Test Reports] as the depicted by the first orange arrow.
- Lastly you may optionally add images as pages to your E-COC by clicking on the second blue button [Add Additional Images] as depicted by the second orange arrow.
- When you are done with the draft version of your E-COC click on red button [LOCK E-COC] to finalize your draft version. Please note that this is also a required section therefore marked by a red [R]
When you lock and E-COC it will be moved to the archive where you are allowed to print or attached signatures before saving to PDF or printing but you will not be able to modify any values anymore. So please make sure that your E-COC is correct before Locking it.
Noteworthy Remarks
The following points further explorer additional and passive functionality of the E-COC Dashboard and Application.
- You are more than welcome to do more than one E-COC draft at a time. You do not have to complete the one you are busy with before you can continue.
- While in draft stages you may alter your E-COC as many times as you like.
- You may also attache as many Additional Test Reports as you need.
- As previously mentioned, you can do this from anywhere where you have a similar setup that you have at office.
- E-COC'S are listed in descending order, meaning the latest will always appear on top.
At first glance the E-COC might appear complex in design but familiarity will get you up to speed quickly.
I also recommend to set aside one E-COC for the purposes of practicing, this way you can always test new or existing features without compromising those you need to hand to a client.
[Next Chapter]